Safety and success using Medtronic's 770G hybrid closed-loop insulin pump in Auto Mode depends on different decisions and device management tasks compared to previous pump models. Here are some of the keys to safety and success for Auto Mode gleaned from Medtronic and our practice. This information is intended to be used by an educator to review with patients in class or individually. Although effort is made to keep this information updated and accurate, the most reliable source of information regarding the 770G insulin pump is Medtronic, in collaboration with patients and their healthcare teams.
Safety Reminder - When preventing DKA while using a hybrid closed loop pump:
- Place the pump in manual mode before giving insulin by pen or syringe.
- Keep the pump in manual mode for at least 4 hours after the last injection of insulin by pen or syringe.
- After resuming automated insulin delivery, check that the desired glucose target is set.
Auto Mode Preparation
- Require more than 8 units TDD and less than 250 units TDD.
- Know how to prevent DKA in insulin pump therapy.
- Complete the Medtronic Learning Module for Auto Mode
- Set up a Carelink account, upload pump settings and print off a report of pump settings. Carelink is essential for use of Auto Mode.
- Use CGM in the pump ideally for 6 days or longer immediately prior starting Auto Mode (minimum 48 hours)
- Insert a new sensor 1-2 days before starting Auto Mode
- Have Carb Ratio and Active Insulin Time correctly entered into pump. See here.
- Change bolus delivery speed to Quick (15u/min) from Standard (1.5u/min). See here.
- Provide Auto Mode Prep & Keys to Success Handout or view here with direct link to open.
- Rise early to test blood glucose. Correct a high reading at least 3 hour before starting Auto Mode. We've observed Auto Mode has a harder time the first 24 hours if starting with a significantly high reading.
- If blood glucose is still considerably elevated before Auto Mode start, consider correcting the high reading and delaying Auto Mode start for 2-3 hours. If a manual injection is required, delay Auto Mode start for 4 hours.
- Bring to the training session:
- pump
- meter and strips (Auto Mode cannot be used with without a blood glucose meter.)
- pump safety kit
Auto Mode Start
Trainers: the virtual 770G pump is here. Turn on Sensor first (options, utilities, sensor settings, turn on) to be able to view SmartGuard afterwards (options, SmartGuard)
- Verify all preparations mentioned above are complete.
- Read the Medtronic Auto Mode Warning here.
- Check the Home screen for certain conditions. Check here.
- Turn Auto Mode on with these instructions.
- Review keys to safety and success in Auto Mode below or with handout.
- Review items in the AutoMode Checklist with your trainer.
KEYS TO SUCCESS IN AUTO MODE
Trusting Auto Mode
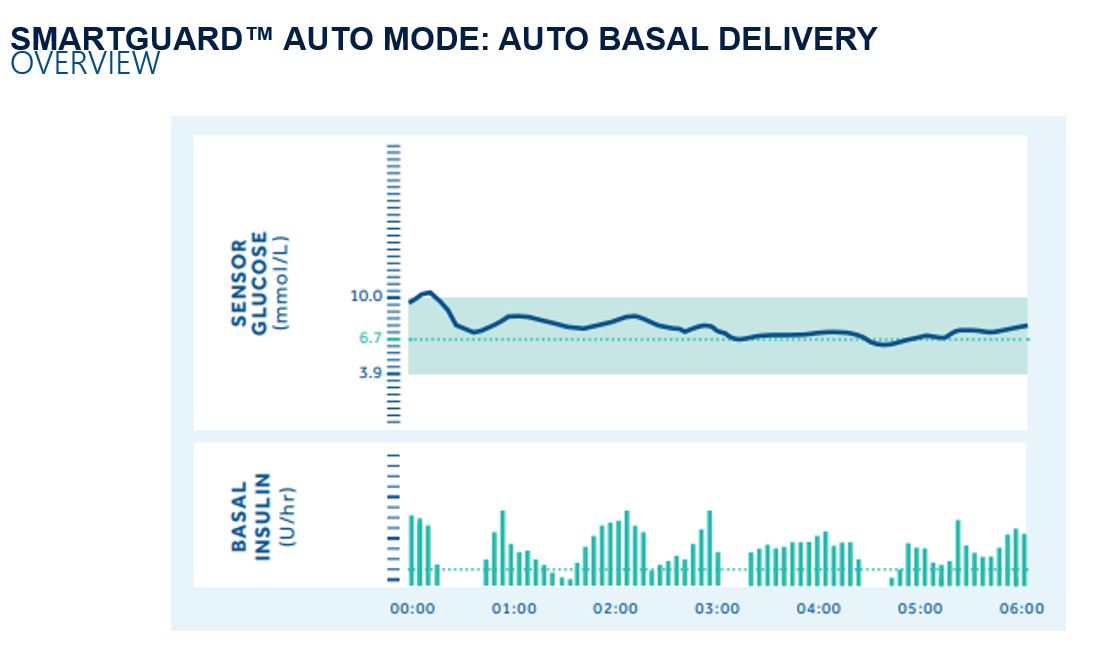
- Auto Mode functions like a “dimmer switch”. It turns basal insulin up, down or off according to your needs. You’ll only be able to control the carbohydrate ratio and active insulin time. The basal insulin provided will be different every day. There will be times you get no (zero) basal insulin.
- Be patient. The algorithm needs to "learn" your needs. It can take 2-3 weeks. Remember, the device is not intended to replace finger stick checks; it is designed to remove some diabetes decisions and improve glycemic control. This will take more "device management" but less "diabetes management."
- The more accurate and honest you are with the carbohydrate grams programmed and eaten, the better (and faster) the pump algorithm will respond.
- You will have have less diabetes decisions
- Basal rates will not need to be tested if using Auto Mode full time. (Basal rates should be updated periodically in Manual Mode to reflect recent insulin needs.This is important for times you are not in Auto Mode.)
- Temporary basal rates are not available for use in Auto Mode. The pump addresses automatically.
- Suggested meal bolus or correction doses can be accepted or declined, but cannot be modified.
- No insulin sensitivity factor (ISF) is used. The ISF cannot be adjusted in Auto Mode. The algorithm decides on correction based on recent insulin needs.
- No dual/square wave boluses are available in Auto Mode
- Only two target glucose levels can be used. Default is 6.7 mmol/L and temporary target is 8.3 mmol/L (for both before and after meal readings)
- You will have more device management tasks, many relate to staying in Auto Mode (avoiding exits)
- Provide extra blood glucose tests when asked (total approx 6-7 blood glucose finger checks per day)
- Change glucose sensors; ensure sensor is secured.
- Set temporary target of 8.3 mmol/L if needed for exercise or other situations.
- Respond to any other alerts and alarms
Blood Glucose Checks and Calibrations
- The 670G and 770G require blood glucose fingerstick checks for calibration and at other times to maintain sensor accuracy. Always carry a blood glucose meter. Expect 6-7 blood glucose finger checks per day for the first few weeks; you may have less later on. Auto Mode will not work without these. The sensor will not give readings if > 12 hours since the last calibration.
- Calibrate with a BLOOD glucose meter that is accurate compared to a lab blood glucose test.
- Do not calibrate using the reading from any sensor (Guardian, Dexcom, Libre)
- Wait 5 minutes for calibration bar to show it has finished before eating.
- Calibrate when glucose levels are stable, like before meals.
- Delay calibrating if you have rising or dropping arrows, particularly 2-3 arrows.
- If the calibration is not accepted, wait at least 1 hour before trying to recalibrate.
- "Sensor Updating" indicates the system is awaiting feedback. If this doesn't clear, connect with Customer Support. Note that other wireless products (e.g. game controllers) may communicate using the same MHz frequency band, and may interfere with communications between transmitter and pump.
- Calibrate 3-4 times per day for the best sensor accuracy
- Upon waking
- Before bed
- Before 1-2 other meals
- Whenever the pump requests another calibration or another blood glucose test for sensor health.
Boluses (Meal and Correction)
- These bolus features are NOT available in Auto Mode:
- dual or square wave bolus
- easy bolus
- pre-set bolus
- manual bolus
- remote bolus.
- Note that typically most people will have significantly > 50% of TDD as basal (e.g. 60-70%)
- Set insulin delivery speed to Quick (see here).
- Calibrate and wait 5 minutes before eating.
- Enter accurate carb count and bolus before eating all meals and snacks, not after.
- Do not “shave off” or add "phantom” grams of carbohydrate in anticipation of exercise or being sedentary. Use a temporary target of 8.3 mmol/L if needed before and after exercise.
- Accept or decline the bolus suggestion in Auto Mode; it cannot be modified.
- Give the suggested correction boluses when the pump recommends; this can be accepted or declined but not modified.
- If bolusing more than 25 units at one time (max bolus), deliver in two separate boluses.
- If you forget your bolus in Auto Mode and glucose is high:
-
- If < 1 hour: Enter half the grams of carb and take the bolus, and recheck in an hour.
- If > 1 hour: Test BG and take recommended correction dose.
Hypoglycemia
- Treat glucose readings under 4.0 mmol/L. Waiting for the auto basal at zero units to take effect is too slow. Delayed treatment can reduce symptoms of the next low blood sugar and, over time, increase the risk of developing hypoglycemia unawareness.
- Less than 15 grams of carbohydrate may be needed to treat hypoglycemia. Start with 15g for the first low and assess. Remember, the pump will also be reducing or stopping basal insulin in response to this low. However, it cannot correct your blood sugar as fast as eating glucose.
- Do not “shave off” grams of carbohydrate from what you input into the pump for your next meal or snack. If you are active and worried about recurring hypoglycemia, set a temporary target of 8.3 mmol/L (see here). The pump will adjust basal for this.
Hyperglycemia
- If glucose over 13.9 mmol/L check for ketones. If blood ketones 0.6 mmol/L or greater, or urine ketones more than trace (5 mg/dL):
- Stop Auto Mode. Resume Manual Mode.
- Give manual injection. Follow guidelines for DKA prevention.
- Resume Auto Mode when ketones are cleared, glucose readings improved and 3-4 hours after last manual injection.
- When Auto Mode is turned back on after being in Manual Mode for greater than 4 hours, a 5 hour Auto Mode warm-up (or longer) may be required.
Dawn Phenomenon
- The current 670G and 770G algorithm will increase basal rates, we are told, by unknown maximums per 6 days. It's possible that the 670G may take up to 6 weeks in some individuals to adequately step up morning basal insulin to address dawn phenomenon. Patience is one strategy.
- Another strategy (not indicated by Medtronic, but used by patients) is to enter a false high blood glucose reading to prompt a correction (but do NOT calibrate with this). This should not be done if "calibration not accepted" alert has recently been received as it may force a sensor failure.
- A less desirable strategy (not indicated by Medtronic, but used by patients) is to enter "phantom carbs".
- Shortening Active Insulin Time (AIT) by 15-30 minutes or to 3 hr if safe to do so (no frequent lows)
Reduced Frustration and A Good Night's Sleep
- Disable CGM alarms & alerts that are optional or not needed when AutoMode is on, or consider "alert silence" (will still get an alert if 2.8 mmol/L) or longer "snoozes" for high readings.
- Calibrate AND correct high glucose readings at bedtime to avoid being woken by alerts that require action.
- Be sure there is "No Red before bed." The goal is a blue shield.
- Try changing sensor in the morning/over the weekend versus later in the day/evening. The first 24 hours of sensor usually require additional calibrations. To lessen this happening during the night, morning sensor change is suggested.
- Expect there may be more calibrations when there are bigger swings in glucose levels. This should decrease as carb ratios change, glucose excursions become less, and patient’s learn the 670G (and vice versa).
- Consider a different placement of the sensor to avoid "compressions lows". These are false lows caused by laying on a sensor. Some people do well with the sensor on the back of the arm.
Battery Life
- Expect 1 battery per week. Always carry a battery. After the first battery notification there will be 8 hours or less of charge remaining.
- Change screen time to 15 seconds. Main menu > Options > Utilities > Display Options > Backlight > 15 seconds
- Consider longer lasting lithium batteries (try drugstores) or high quality rechargeable batteries.
- After using screen, put the screen to sleep by holding the graph button (click to view).
Suspend
- It is recommended to suspend the pump if disconnecting it. If the pump is not suspended, the algorithm will assume the insulin was delivered during the time the pump was off.
- Some people may choose to use their judgment if the disconnect is short (e.g. shower).
- Do not suspend the pump if you suspect you may be getting low soon. The auto basal will do this. However, do treat a low with glucose if it does occur.
Manual Mode
- Go to manual mode if you’ve given a manual injection by pen or syringe.
- Stay in manual mode for 3-4 hours (your active insulin time). Manual injections are not accounted for in Auto Mode. Do not use Auto Mode for that period of time after giving a manual injection of insulin by syringe or pen. Auto Mode could deliver too much insulin and cause hypoglycemia.
- Turn ‘suspend on low’ or ‘suspend before low’ back on when in Manual Mode.
- When Auto Mode is turned back on after being in Manual Mode for greater than 4 hours, a 5 hour Auto Mode warm-up (or longer) may be required.
- In the rare situation where patient enters Auto Mode for the first time and has to exit into Manual Mode the first day, they may find that when they try to enter Auto Mode again, it will indicate they are in Auto Mode warm-up for greater than 5 hours. If this occurs, they will likely have to turn Auto Mode off, and wait the full 48 hours prior to trying to enter Auto Mode again. Encourage patient to call product support if further questions.
Special Situations - Post illness, steroids, larger daily dosing
- Auto Mode updates its algorithm each night based on insulin usage from the past 6 days. Following periods of dramatically increased insulin requirements (steroids, illness, unusually large portions/binging or prolonged stress) suggest the patient use the temp target (8.3 mmol/L) for a few days until the algorithm readjusts.
Carelink Reports & Follow-up Steps
- Note: To Change Targets in Carelink Professional and Have Reflected in TIR Charts.
Click your name (as educator) at the top right of the screen > my profile > my report settings. Customize settings and click update.This will update targets for ALL the patients you view in Carelink Professional. Be sure to verify and/or change targets with each patient you view, especially if viewing preconception or those with diabetes in pregnancy. (Changing the patient setting in the Professional Carelink does not work. It does work for the patient in their personal Carelink.) - Patient Carelink Training
- Provide patients this setup video: CareLink - Getting Started at Home (youtube)
- CareLink Personal Login to access patient data.
- Carelink Support Page
- Carelink Install Guide.pdf
- Reports & Reviewing Methods
- Main 4 CareLink Reports for Auto Mode (skip down)
- AIM Method to Update ICR, AIT, Manual Basal Rates, ISF (skip down)
- For Carelink Reports not related to Auto Mode see CareLink Reports Guide - PDF and CareLink Personal Reading Your Reports
- Possible glitches for Carelink:
- Suggest delaying upgrades to Mac OS operating systems for a few months
- Bundled reports my have some reports show blank; choose only 1 report and smallest time frame
- If the wrong year is in the pump, it will time out during uploads as keeps trying to find the past year but can't, as can't go back further than 90 days
Steps at Follow-Up:
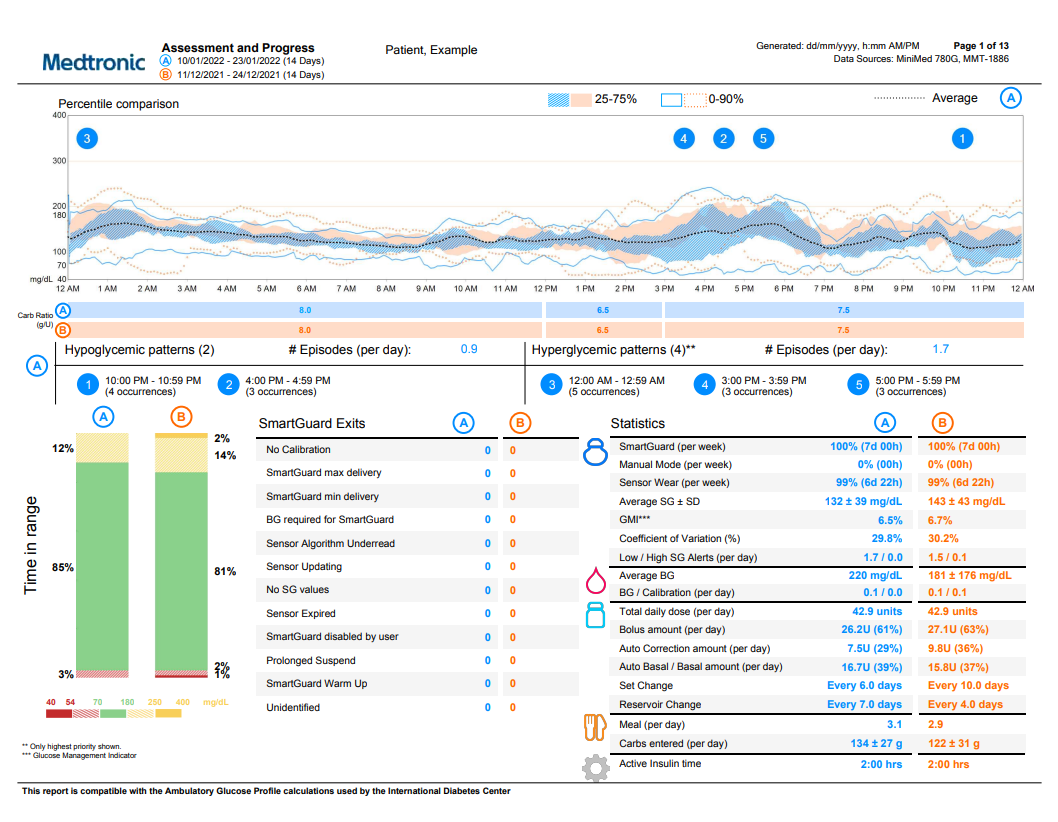
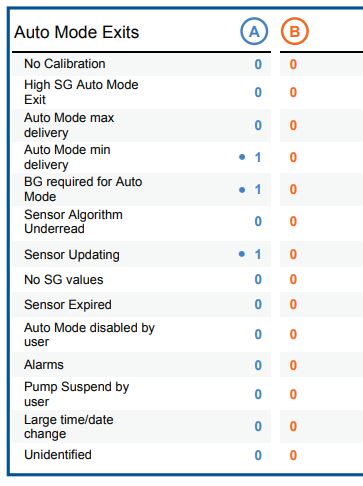
- Review and Reduce Auto Mode exits: Review Auto Mode Exits on Assessment & Progress Report below. Determine actions to reduce.
- Investigate reasons for maximum basal delivered for extended periods of time
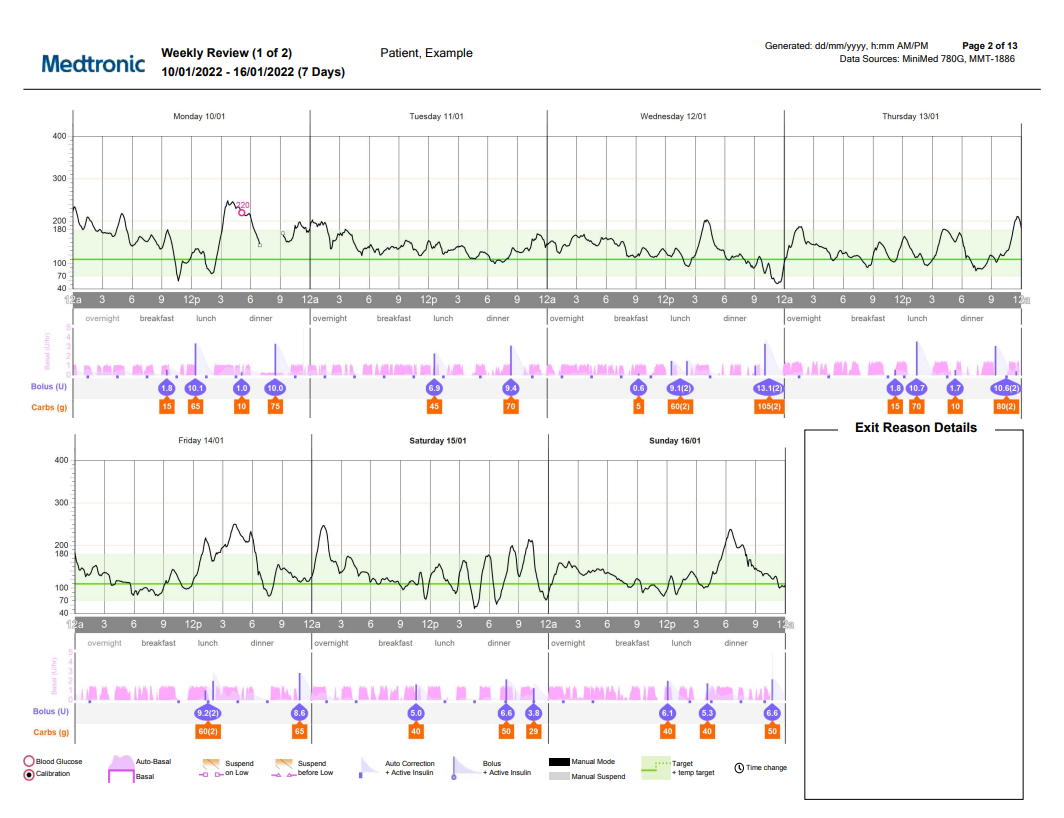
e.g. ICR needs strengthening e.g. subtract gram(s) carb from ICR (see image on report).This is from the Weekly Review Report.
e.g. review CHO counting accuracy
e.g. remind to give bolus 10-15 minutes before meal - Investigate reasons for zero basal for extended periods of time
e.g. bolus given after meal resulting in post meal high readings, followed by low readings (auto basal increased for awhile and then full bolus given later) This is from the Weekly Review Report. (See Meal Bolus heading above for how to address dosing for forgotten meal bolus. )
e.g. ICR may need carb added to it - Update Pump Settings:
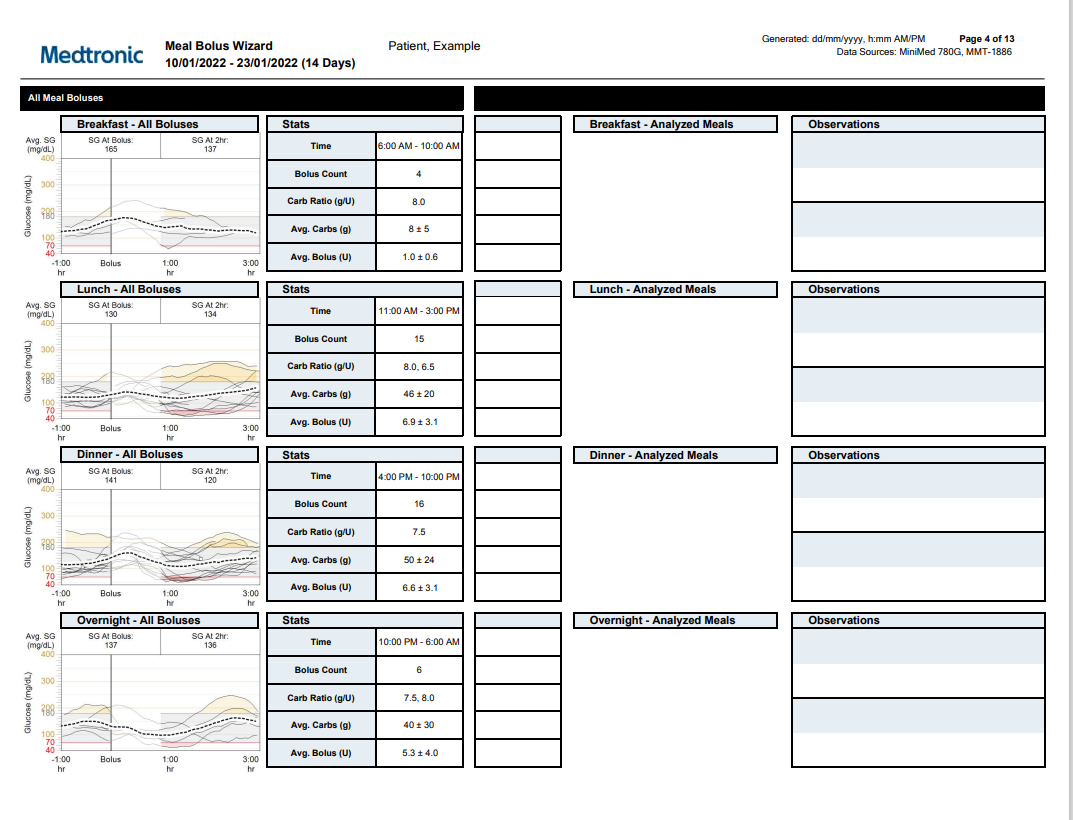
Consider the AIM Method of analyzing these Auto Mode Reports listed below to make changes to:- Insulin to Carb Ratios: (Look at top of graphs for avg before/2 hr after sensor glucose on Meal Bolus Wizard report.)
- If 2 hr pc rising > 3.3 mmol/L, decrease carb in ICR by 10-20%.
- If pc lows occur, increase carb in ICR by 10-20%
- Action Insulin Time (AIT). Adjust if 2-3 after correction in Auto Mode with no meal bolus & no food you see (on the Weekly Review Report)...
- > 8.3 mmol/L, then shorten AIT by 15-30 min
- < 8.3 mmol/L, lengthen AIT by 15-30 min
- Manual Mode Basal Rate Adjustments
- Find daily units of auto basal on the Assessment and Progress Report. See here. Compare to the daily units of basal in the manual mode (see here for on pump instructions) or daily units manual basal seen here in the Device Settings Report.
- Method 1: Daily units auto basal divided by 24 = u/hr manual rate.
Example: Daily auto basal is 24 units; manual basal should be 24/24= 1 unit per hour.
Or, slightly higher rates early morning for dawn phenomenon and slightly lower rest of the day.
Instructions to change manual basal rates are here. - Method 2: (Daily units auto basal) - (total daily manual basal units) = difference.
Distribute the difference over the 24 hours of basal rates.
eg. If daily auto basal units is +6 units greater: 6u/24 hr= 0.25 units/hr to add to the manual basal rates.
If the difference is -6 units, then subtract 0.25 units/hr from each of manual basal rates.
Instructions to change manual basal rates are here.
- Find daily units of auto basal on the Assessment and Progress Report. See here. Compare to the daily units of basal in the manual mode (see here for on pump instructions) or daily units manual basal seen here in the Device Settings Report.
- Manual Mode ISF:
- 100/total daily insulin dose Auto Mode (TDD). Find the TDD on the Assessment and Progress Report see here.
- 100/total daily insulin dose Auto Mode (TDD). Find the TDD on the Assessment and Progress Report see here.
- Manual Mode BG Target
- Consider 5.6-8.3 mmol/L to mirror Auto Mode correction target.
- Insulin to Carb Ratios: (Look at top of graphs for avg before/2 hr after sensor glucose on Meal Bolus Wizard report.)
|
1. Assessment and Progress (A & P) Report 670G
This report is used to:
|
Sample 780G reports (mg/dL not mmol/L) .pdf
|
|
2. Weekly Review Report 670G
This report is used to see if:
|
Sample 780G reports (mg/dL not mmol/L) .pdf
|
|
3. Meal Bolus Wizard Report
This report is used to see if:
|
Sample 780G reports (mg/dL not mmol/L) .pdf
|
|
4. Other Reports
|
Sample 780G reports (mg/dL not mmol/L) .pdf
|